

(NOTE: This post was updated on April 13 2017, for smaller roses inside a thinner pastry layer; all new explanations in purple)
Hello, neighbors ! Spring is here ! First it came to Scotland and Ireland, and now over here in central France our peach tree is blossoming…

… and so are our plates!
My Significant Other had to start attending to our garden this past week. There were strawberry plants in need of a new spot, the raspberry bush to be trimmed, peas to be seeded… As I was watching him from my kitchen window, I was thinking he truly deserved a treat to help him forget the inevitable back pain that would ensue…
I decided to try making something I had been dreaming of for quite a while, but didn’t know if it would come out ok. I got some homemade phyllo leaves out of my freezer* hoping I could substitute them for the flaky pastry traditionally used in this recipe. I folded them, taking care to add olive oil and a little sugar at each folding step, and stuffed them with apple slices and nut butter. The result was a tasty and pretty dessert ! So I made it again and took photos to share with my dear neighbors !
* If you have never tried making my gluten-free phyllo leaves, you need to know that since I first came up with the recipe, I have found (and shared) some tricks that have made my life easier. The best one is that I can now freeze these leaves and use them as needed. They are so thin that you can just get them out of the freezer on the spur of the moment. Now I make them while attending to other things whenever I end up with an unused egg white. And if you think about it, making real flaky pastry dough (« pâte feuilletée »), even with wheat flour, is a lot trickier and time-consuming. Hence my motivation for making my own gluten-free phyllo leaves.
Ingredients (for 5 or 10 roses)

– 5 gluten-free teff flour phyllo leaves (recipe here) OR regular store-bought phyllo leaves, provided you are not gluten-intolerant. Forget about using rice sheets here, there will dry up while baking and you will be sorely disappointed !
– 1 ORGANIC apple, preferably red, for the pretty color of your roses ! (April 13: I used several small apples)
– some mild olive oil (Fear not, dear neighbors, you will never know it when you take a bite of the dessert)
– some pure cane sugar, optional if you are avoiding sugar
– some cashew butter, (OR almond butter) preferably all natural, no oil added, also optional; as a matter of fact, I prefer the roses plain, but my Significant Other likes the nut butter inside (April 13: NO nut butter)
All quantities are really approximate as it all depends on the size of your phyllo leaves. Mine are 20 to 22 cm (8 inches, give or take) in diameter.
Helpful equipment :
– pastry brush
– cooking thread
– muffin tins or ramekins, bottom lined with greaseproof paper or lightly brushed with oil
How to:
(Preheat oven to 180°C / 355° F, regular, not fan-forced heat)
1. Wash and cut the apple(s) in half and remove its core. Cut into regular thin slices and microwave in several batches for 50 seconds to soften. The slices need space to breathe!
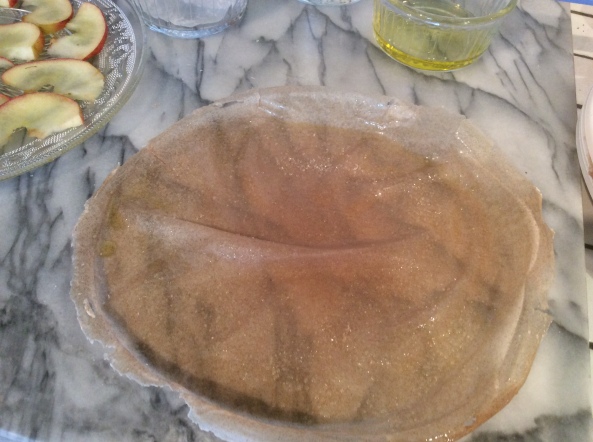
2. Cut phyllo leaves in halves. Take one half and place it on a flat surface, circular side top and diameter close to you. Brush lightly with olive oil and sprinkle lightly with sugar if desired.
3. Fold top over bottom as shown in picture into a rectangle-like shape. Again, brush with oil and sprinkle with sugar.


4. Place a few apple slices over top half of your rectangle, slightly overlapping. Do not crowd the apple slices. I use about six per rose. Using too many slices would make the next step difficult and result in breaking the dough. The slices should come a little higher than the top of the dough.
5. Fold the bottom part up over the apples, then roll gently (and not too tight) to form a rose. Secure with baking thread and place in a ramekin. Repeat steps 1 through 5 until all your roses are ready, placing about three roses per ramekin.


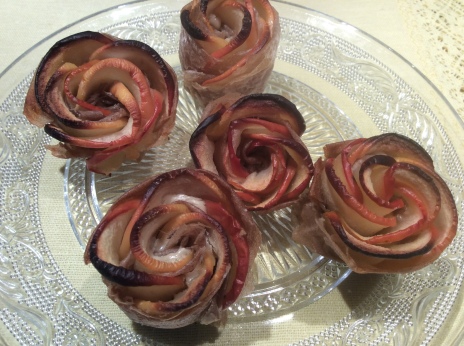
6. Bake the roses inside lined ramekins for about 45 minutes. Check the baking towards the end and cover with foil or greaseproof paper to prevent burning if necessary. You don’t want them to burn but you do want the dough to be very crunchy.
(Here follows the original recipe)
2. Lay one phyllo leaf on a flat surface. Brush lightly with olive oil and sprinkle lightly with sugar if desired.
3. Fold the leaf in three by bringing about one third of the top towards you and the bottom third over it. Top and bottom parts will overlap. Repeat oil (and sugar) operation over top half and spread a little nut butter over bottom half.

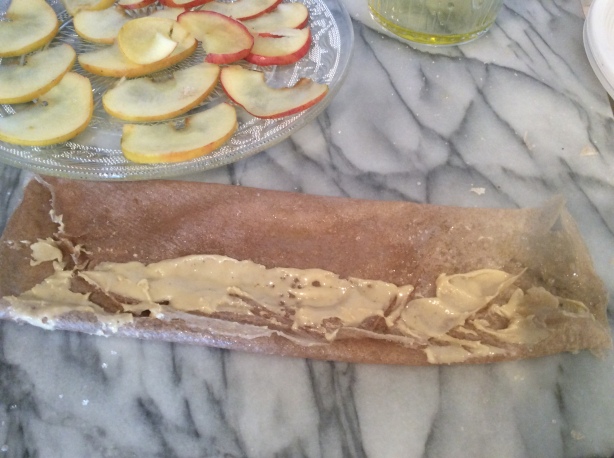
4. Place a few apple slices over top half of your rectangle, slightly overlapping. Do not crowd the apple slices. I use about six per rose. Using too many slices would make the next step difficult and result in breaking the dough. The slices should come a little higher than the top of the dough. Fold the nut bettered part up over the apples.

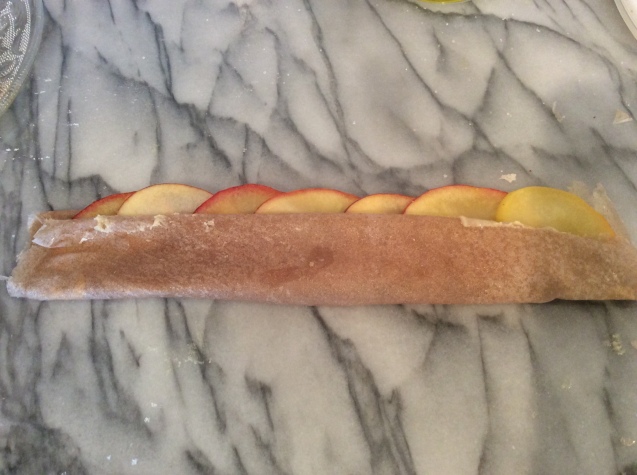
5. Roll the resulting rectangle to form a rose. Secure with baking thread. Repeat steps 1 through 5 until all your roses are ready.

6. Bake the roses inside lined ramekins for about 45 minutes. Check the baking towards the end and cover with foil or greaseproof paper to prevent burning if necessary. I almost forgot to cover mine ! You don’t want them to burn but you do want the dough to be very crunchy.
Dear neighbors, I wish you all a nice weekend and a glorious spring !

love this – recipe & intro alike! – & love your bilingual site
LikeLiked by 1 person
Thank you for stopping by and for your warm comment! I am not always so well inspired for my intros… And if you read French, you will have noticed that they are not word for word translations. My brain doesn’t think exactly the same way in the two languages 🙃…
LikeLiked by 1 person
my French is miniscule, Joëlle – hence, my enjoyment of your English shows how good a writer you are 🙂
LikeLiked by 1 person
😊
LikeLiked by 1 person
These are simply spectacular! Thank you, Joelle!
LikeLiked by 1 person
Thank you Dolly! It is safer to have me in the kitchen baking apple roses than in the garden tending to the real ones… Just ask my husband: I am well-known for mistaking young seedlings just beginning to sprout for weeds to be pulled out!
LikeLiked by 1 person
At least you attempt to tend the garden; I wouldn’t know where to begin. Even houseplants don’t do that well in my house…
LikeLiked by 1 person
So very pretty Joelle. A true taste and look of spring. Love the blossoming tree against the blue sky as well 🙂
LikeLiked by 2 people
Thank you 😊. The blue sky was yesterday, nothing but gray today, and colder too! Over here no fruit tree is safe until after May 13; gardeners are weary of what they call “les saints de glace” (ice saints?), three days (May 11-12-13) when it usually gets colder and we sometimes get frost, which kills all buds. It’s better if spring doesn’t start too early!
LikeLike
Looks yummy. I’ll have to try your gluten free phyllo leaves recipe.
LikeLiked by 2 people
Thank you. Let me know if you make the phyllo leaves, and if you have any problems with my recipe. I couldn’t do without them now.
LikeLike
They’re really pretty. I wish I had the dexterity to make something so intricate. They must be delicious, neighbour. I always enjoy seeing what you’ll make next. Wonderful! I also envy you your fruit tree.
LikeLiked by 2 people
Thank you, neighbor! There is no reason why you couldn’t achieve the same result, honestly.
Let me tell you about our peach tree. Once upon a time, there was an organic peach pit that somehow liked the soil where it had been thrown away (spat out, most likely!) and decided to grow. Not a very convenient spot, right next to our back stairs, but we left it anyway. We have never treated it, and depending on the year, the weather and so on, we get decent peaches… or not! Two years ago it gave a nice crop even though some of the peaches were spoiled from the inside. Last year was too dry and we got close to nothing.
By the way, I forgot to tell you that shallots / shallats 😉are very tasty. You should like them.
LikeLiked by 1 person
We have a similar tree in our garden. It just popped up one day, it as these spherical clusters of white flowers. It’s called a snowball tree and it must have been seeded when some bird flew over. I’d rather it flew over with a fruit seed, but you make do with what you have. Well, when I harvest them I’ll have to find a worthwhile use for them!
LikeLiked by 1 person