This is my basic recipe for a gluten-free, sulfite-free homemade bread. The one in the photo had a mix of rice, tapioca and amaranth flour but I have also used other combinations: rice, sorghum and buckwheat, for instance, or rice, buckwheat and quinoa.
Just keep the proportions for the rice flour and starch as indicated in the recipe and experiment as you like for the other flours.
Preparation:
In a pan, warm 450 ml water. The water should be lukewarm, but not hot so as not kill the yeast. Partially pour over 1 1/2 tsp (one and a half teaspoon) of dry active yeast .
Meanwhile, mix together:
150 g rice flour
130 g tapioca flour, not starch
75 g amaranth flour
90 g potato starch (apparently, Trader Joe’s brand is sulfite free. Arrow-root may work also, but I haven’t tried yet.)
75 g ground flaxseed or almond meal, or a combination of both)
1 ¼ tsp psyllium or xantham gum or guar gum
1 ¼ tsp sea salt)
NOTE: To make sure everything is well mixed, I use a big glass jar (although I suppose any other type of container with a tigh-fitting lid will work), close it tightly and shake well. Transfer to a large mixing bowl.
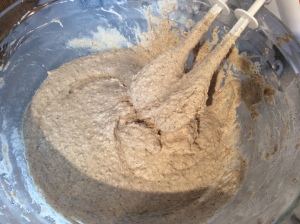
When the yeast-water mixture has become foamy, pour it over the flour, and mix with an egg-beater, gradually adding the rest of the water. Mixing takes about 2 minutes. There is absolutely no need for a bread-making machine, as the “dough” will have the consistency of a thickish muffin batter. Gluten free dough cannot be kneaded, that was one of the very first things I learned when we embarked on this journey to better health! If necessary, add a little more water. I find it difficult to give an exact measure for the liquid, as it does vary depending on the flour you use. It should roughly look like this:

Pour the batter into a lined and greased baking pan (I usually use olive oil for the greasing) and let rise in a warm place for about two hours. In the winter, I let it rise on top of a radiator…


Preheat the oven to 240°C / 465°F
Bake for 15 minutes at this high temperature, then lower to 185°C / 365°F and bake for another hour and 10 or even 15 minutes. You may want to protect your bread with aluminum foil if if starts browning too much.
When the loaf has cooled down, you can slice it up and freeze the slices for further usage. These slices are excellent toasted… I have one for breakfast almost every day.


As promised, I am back – Just ❤ ❤ ❤ this bread !! Awesome. Thanks for sharing.
LikeLiked by 1 person
I have to confess I am waaaayyy behind on my posts for this blog. Never imagined it would take so much time to feed two blogs… Anyway, your comment is pushing me to post my English muffin recipe by the end of next week. It’s a promise. Thanks for liking!
LikeLiked by 1 person
Thanks would love that, as unfortunately I do not understand or speak French, and I am a bit muffin crazy – call me the muffin lady. You will see on my blog lots and lots of muffin recipes that I have made myself. Thanks I am looking forward to your muffin post.
LikeLiked by 1 person